I recently helped organize a training in agroforestry techniques. Specifically, we learned about various types of plants that flower for 10 months out of the year (good for beekeeping!) and also feritilize the earth, how to make germoires, how to increase tenfold the production of banana and plantain trees over traditional methods, and how to obtain carbon copies of existing fruit trees. I decided to put a selection of photos from this project on my blog with explanations. I hope you find the following interesting and enjoy it!

This is Magloire and Dang Assebe, a member of CAPJ, helping build the hangar where the training took place.

The completed hangar. It just needed to be covered with palm leaves. Notice the huge sacks of sawdust and the wood planks – both materials readily available in Ngambe Tikar for free because of the sawmill. Also some of the main materials that are needed to build the nurseries and employ many of the techniques we learned.


Next, we needed to construct the framework which would support the clear plastic tarpaulin that would cover the chassis.

Here, it’s clear that the framework is almost complete. The only thing left is to do is saw off the excess length of the wood.

The clear tarp is already attached and we are filling the nursery bed with sawdust. Sawdust is used because it’s light and airy and doesn’t compact as much as soil, and thus provides a good environment for the banana and plantain rejets to sprout (again, rejet is the French word; I don’t even know how to explain it well without showing you a picture of how banana and plantain trees regenerate). Before placing the banana and plantain rejets into the sawdust, we sifted the sawdust and ensured there were no big clumps.

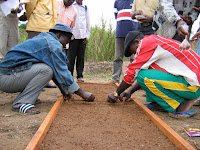
We had bought 200 rejets of banana and plantain trees and there was a huge pile of them (bottom left). Blaise showed us how to clean these rejets so they’d be ready to plant in the nursery. Here, the women (and men) are cleaning the rejets to prepare them for the nursery.


Another photo of the prepared rejets. Behind them, you can see how the pile of rejets has been reduced to nothing but scraps.

Blaise explaining how to kill the merystem of the banana rejet. The rejet is what’s used to propagate banana and plantain trees, rather than seeds. Banana and plantain trees naturally sprout 4-5 rejets, which will then become trees themselves when the mother tree dies. Killing the merystem of the rejet makes it impossible for the tree itself to grow. This is desired because then, instead of growing into a tree, the rejet will sprout 4-5 new rejets. When those rejets sprout, we will repeat the process – preparing these new rejets to be planted in the nursery and killing the merystem again so they can again sprout more banana or plantain rejets instead of growing into a fruit-producing tree. When the rejets sprout again from the second generation rejets, however, we will allow harvest the sprouts and let them grow into trees, ie not kill the merystem. Net gain: each rejet that we collected and prepared will eventually give up to 10 trees instead of only one, which is the standard practice.

Planting the prepared rejets into the sawdust nursery bed. After planting, we let them sit overnight so that they would dry out before watering them the next day. This was done to prevent rotting. The following day, we also covered the rejets with a light layer of sawdust.


Building the framwork for the “chassis de reeducation.”


The first marcotte harvested in Ngambé Tikar, it came from a marcotte we placed last October, shortly before the dry season began. Marcotting can be used on almost any kind of fruit tree, including but not limited to: guava, avocado, all citrus (mandarin oranges, oranges, grapefruits, lemons, limes), corossol (a fruit native to tropical zones), mango, and prune (again, a different kind of prune than we know in the US - this prune is small and cylindrical, about fist-sized, with a purple/blue exterior and a bright green interior and a large pit).


After harvesting the marcottes we had placed last October, we planted them in sachets and placed them in our “chassis de reeducation,” as shown here. In the chassis, the controlled environment will allow the branch to "re-learn" how to be a tree, instead of just a branch - and voila! Once it begins to sprout buds, it is officially a carbon copy of the tree you started with.

Everyone pitched in to help plants the seeds. In the foreground of the germoire (or germinator), you can see we’ve planted avocado pits. When the pits begin to grow into trees, they will be used as “porte-greffes” or graft carriers. The next technique that Blaise will teach us will be grafting. In preparation for this next training, he has asked everyone to grow as many port-greffes as possible during the next five months.

Family photo on the last day. Some people were missing from this photo – we had 27 people come to at least one day of the three-day training and 21 people participate in most or all of the training.
AFTER


The calliandra has sprouted and is growing fast!


BEFORE:

This is Magloire and Dang Assebe, a member of CAPJ, helping build the hangar where the training took place.

The completed hangar. It just needed to be covered with palm leaves. Notice the huge sacks of sawdust and the wood planks – both materials readily available in Ngambe Tikar for free because of the sawmill. Also some of the main materials that are needed to build the nurseries and employ many of the techniques we learned.
DURING:
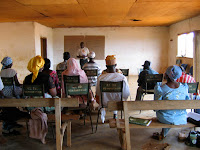

Training begun, Blaise Komkom Magloire, the trainer, laying some groundwork, explaining what exactly agroforestry is and why people should practice it.

Here, we are building the “chassis géant” or Giant Chassis. Please forgive my translations. Since I’m not an agroforestry volunteer and the average French-english dictionary doesn’t have translations for random French agro vocabulary, I’ve done the best I could. The first step was to build the groundwork and lay it in place. We then had to assure that the ground was well-leveled before pouring insecticide on the ground.

Next, we needed to construct the framework which would support the clear plastic tarpaulin that would cover the chassis.

Here, it’s clear that the framework is almost complete. The only thing left is to do is saw off the excess length of the wood.

The clear tarp is already attached and we are filling the nursery bed with sawdust. Sawdust is used because it’s light and airy and doesn’t compact as much as soil, and thus provides a good environment for the banana and plantain rejets to sprout (again, rejet is the French word; I don’t even know how to explain it well without showing you a picture of how banana and plantain trees regenerate). Before placing the banana and plantain rejets into the sawdust, we sifted the sawdust and ensured there were no big clumps.

We had bought 200 rejets of banana and plantain trees and there was a huge pile of them (bottom left). Blaise showed us how to clean these rejets so they’d be ready to plant in the nursery. Here, the women (and men) are cleaning the rejets to prepare them for the nursery.

Cleaned and prepared rejets, pre-planting.

Another photo of the prepared rejets. Behind them, you can see how the pile of rejets has been reduced to nothing but scraps.

Blaise explaining how to kill the merystem of the banana rejet. The rejet is what’s used to propagate banana and plantain trees, rather than seeds. Banana and plantain trees naturally sprout 4-5 rejets, which will then become trees themselves when the mother tree dies. Killing the merystem of the rejet makes it impossible for the tree itself to grow. This is desired because then, instead of growing into a tree, the rejet will sprout 4-5 new rejets. When those rejets sprout, we will repeat the process – preparing these new rejets to be planted in the nursery and killing the merystem again so they can again sprout more banana or plantain rejets instead of growing into a fruit-producing tree. When the rejets sprout again from the second generation rejets, however, we will allow harvest the sprouts and let them grow into trees, ie not kill the merystem. Net gain: each rejet that we collected and prepared will eventually give up to 10 trees instead of only one, which is the standard practice.

Planting the prepared rejets into the sawdust nursery bed. After planting, we let them sit overnight so that they would dry out before watering them the next day. This was done to prevent rotting. The following day, we also covered the rejets with a light layer of sawdust.

The planted rejets. When we finished, the entire bed was full.

Building the framwork for the “chassis de reeducation.”

Filling the “chassis de reeducation” with sand.

The “chassis de reeducation,” now with the framework firmly attached and covered in clear tarp. The gap left was to build a door. Whereas the other nursery was not intended to be stepped on, this one is, and you enter the nursery/greenhouse-like space through the door.

Blaise explaining how to place a marcotte on an existing fruit tree. Marcotting is a technique that allows someone to clone an existing fruit tree. The advantages of marcotting over simply planting trees from seeds are: if you marcotte, you know if they tree will give good fruit, give fruit early, big fruits, juicy fruits, etc, because the resulting tree will have the exact same characteristics as the tree it came from. Another advantage is that the tree will begin producing more quickly than a tree grown from seed – in about 2 years, rather than 4 or 5. Finally, a marcotted tree will be of small stature, and won’t grow to huge sizes that take up space when land is limited.
A note about translation: marcotter translates to "layering." I don't love this translation, so I'll stick with the anglicization of the French.

Mama Veronique showing how to place the marcotte. Mama Veronique and her GIC were key hosts in inviting Blaise for his “prise de contacte” or first visit last October. At that time, Blaise showed those present how to place marcottes, so Mama Veronique had already seen the technique and Blaise wanted her to explain it to the others.


Mama Veronique showing how to place the marcotte. Mama Veronique and her GIC were key hosts in inviting Blaise for his “prise de contacte” or first visit last October. At that time, Blaise showed those present how to place marcottes, so Mama Veronique had already seen the technique and Blaise wanted her to explain it to the others.

Mah Antoine finishing the marcotte that Veronique started, filling the marcotte sachet with sawdust. You can see how sawdust is needed for a lot of this work! Fortunately, Ngambé Tikar has a sawmill, and thus, an almost unending supply of free sawdust.

The first marcotte harvested in Ngambé Tikar, it came from a marcotte we placed last October, shortly before the dry season began. Marcotting can be used on almost any kind of fruit tree, including but not limited to: guava, avocado, all citrus (mandarin oranges, oranges, grapefruits, lemons, limes), corossol (a fruit native to tropical zones), mango, and prune (again, a different kind of prune than we know in the US - this prune is small and cylindrical, about fist-sized, with a purple/blue exterior and a bright green interior and a large pit).

Albert preparing the marcotte, now with roots, in a sachet so the branch becomes a tree.

After harvesting the marcottes we had placed last October, we planted them in sachets and placed them in our “chassis de reeducation,” as shown here. In the chassis, the controlled environment will allow the branch to "re-learn" how to be a tree, instead of just a branch - and voila! Once it begins to sprout buds, it is officially a carbon copy of the tree you started with.

Blaise brought a small quantity of calliandra seeds with him, which are good for fertilizing that earth and are in bloom 10 months out of the year. Here, we’ve built a germoire or germinating nursery and are preparing to plant the calliandra seeds.

Everyone pitched in to help plants the seeds. In the foreground of the germoire (or germinator), you can see we’ve planted avocado pits. When the pits begin to grow into trees, they will be used as “porte-greffes” or graft carriers. The next technique that Blaise will teach us will be grafting. In preparation for this next training, he has asked everyone to grow as many port-greffes as possible during the next five months.

Family photo on the last day. Some people were missing from this photo – we had 27 people come to at least one day of the three-day training and 21 people participate in most or all of the training.
AFTER

I took these photos of “La Station,” as we’ve named the training site on April 19, about 2 weeks post-training. In the foreground are germoires for the calliandra and for the porte-greffes. The two closest germoires were created after the training to sprout more porte-greffes.

The calliandra has sprouted and is growing fast!

Isn’t it beautiful?

I was pleased to find that the banana and plantain rejets are already sprouting after only two weeks! In the foreground, the blurry white blob is a sprout, as is the green and pink thing jutting out of the sawdust. Another blurry white blob set against the sawdust in the background is yet another sprout.